Ballet Flats Transformation

So I had a pair of boring flats that have been sitting in my closet for over 5 years now and I was sick of them taking up space. I had to wear them in a wedding I was in (wasn't too excited about it) and for some reason held on to them. Instead of getting rid of them I decided to transform them into something I thought was more acceptable so I can wear them this summer. 
BEFORE:
Let me explain my processes of transformation. We will once again be using the fabulous Mod Podge along with some old fabric I had lying around (same as the books in my previous blog), sponge brush, scissors, sharp razor blade, lace ribbon and pearl pendant like decor I picked up from my local crafts store (you guessed it, Michaels). 

First I cut out a big enough section of my first fabric for both of the flats. 
Then I cut the fabric in half for each flat. 
I then wrapped the fabric around the flat tight and held it so I can make the whole for the inside with my razor. 
Then out came "The Podge". One side at a time I applied the podge and glued the fabric down. I did not put any on the tip yet.

I then applied pressure and once it was done drying I began to trim the bottom so the fabric would align properly with the flat. 

I cut the fabric at the tip of the flat where later I will place a different design.

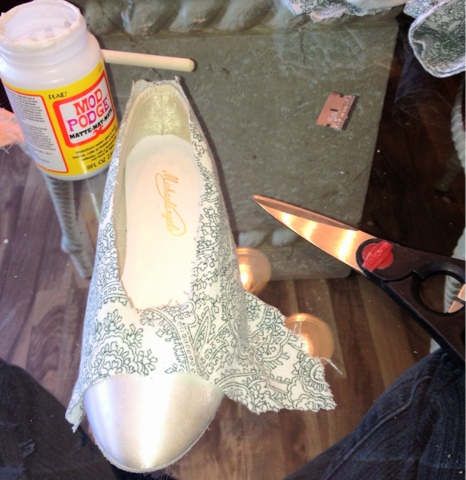
I applied the podge onto the fabric to create a more durable texture and seal.(would not recommend putting podge over the fabric on the inner part of the shoe. It makes it uncomfortable against your foot).

Next I podged the tip of the flat and applied my other fabric. I then cut the lace ribbon to fit across the two fabrics giving a neat finish and used the podge to glue it on (do not podge on top of lace except at very bottoms). 
Once it was finished drying I then trimmed the fabric along the bottom to align with the flat and podge the edges down. 

Finally, I made a bow out of the second fabric and held it together with my pearl pendant then hot glued it onto the top of the shoe. 
AFTER:
TRANSFORMATION! 

Birthday Care Package

This project was to personalize a birthday care package I was sending to my future sister in law for her birthday. It was her first birthday away from the family and I thought maybe a little personal touch would make her feel a little more at home.
I used four different types of wrapping paper that I got from the dollar store. I started with measuring the box with the paper and cutting out each area to fit. 
I placed each piece in the box to make sure they fit and creased the paper along the edges so when I went to glue them in they wouldn't be giving me any trouble. 
After all the pieces were cut and fit correctly I started applying the Mod Podge along the inside of the box doing one section at a time. 
Then get the creases out and help the paper stick.
And viola! One birthday care package to go.

Vintage Inspired Centerpiece Decor

Deciding on Centerpieces for my wedding was the biggest headache. I had so many great ideas for a DIY centerpiece but the cost of the materials was more then it was worth to make. Then one day I was once again browsing at my favorite local craft store Michaels and came across a collection of storage book decorations. They were cute but again expensive and not enough of a variety of ones that I liked. So again I got my creativity juices flowing. With vintage looking books as my inspiration I knew it was time to break out "The Podge".

I started with purchasing three different sized hardback books at a thrift store for a dollar a book. I also managed to find the perfect assortment of fabric (pillowcases and a runner) for my idea at two to three dollars. That was all I needed! 

I first took the paper covering off the books and used a razor to cut the fabric to size for the three books with the three different fabric designs. Then out came the Mod Podge and sponge brush. I started by covering one side at a time of the books cover in Podge and glued the fabric on. Once both sides were finished I opened the book and Podged the hangover fabric down to the inside of the book cover. The final touch was brushing a finishing seal of Podge all over the fabric to help the fabric not move and give it a stiffer texture. 

Once all three books were dried I stacked them up and tied them with a piece of brown twine. I plan on each table having three books each with an assortment of fabric designs along with the flower arrangement and vintage picture frame with a photo of my fiancĂ© and I. 
I apologize I didn't get a picture with the twine wrapped around but you could imagine. 


All About Podge

Mod Podge that is.

It started with my desperate attempt to find a personalized gift for my bridesmaids. After searching the web and realizing how expensive such gifts were I came to terms that I just needed to get creative and make my own. Then it came to me, I wanted to present my bridesmaids with flip flops for the reception to allow them to have more comfort (who wants to be in heels that long in the summer heat outdoors anyway?). So I got my inspiration on.
Off I went to the local craft store Michaels. I grabbed fancy sticker letters (about three to four sheets) and of course matte Mod Podge. I continued to pick up some cheap flip flops at Old Navy than headed home to begin my first project with "The Podge". 

This simple project had two easy steps, TWO! That's it! I spelled out the name of my bridesmaid with the stickers on the left flop and the word bridesmaid on the right. The second and final step was breaking out my Mod Podge, grabbing a small sponge brush and lightly brushing over the letter area. NOTE: Mod Podge is magic. It will not stay white but instead become invisible! So don't worry about perfection. It dries fast too! AMAZING!

That's how I made my bridesmaids (and myself) personalized flip flops for the reception.

up